注意
转到结尾下载完整示例代码。
向量加法
在本教程中,您将使用 Triton 编写一个简单的向量加法。
通过本教程,您将了解到
Triton 的基本编程模型。
用于定义 Triton 内核的 triton.jit 装饰器。
针对原生参考实现,验证和基准测试自定义算子的最佳实践。
计算内核
import torch

import triton
import triton.language as tl

DEVICE = triton.runtime.driver.active.get_active_torch_device()


@triton.jit
def add_kernel(x_ptr,  # *Pointer* to first input vector.
               y_ptr,  # *Pointer* to second input vector.
               output_ptr,  # *Pointer* to output vector.
               n_elements,  # Size of the vector.
               BLOCK_SIZE: tl.constexpr,  # Number of elements each program should process.
               # NOTE: `constexpr` so it can be used as a shape value.
               ):
    # There are multiple 'programs' processing different data. We identify which program
    # we are here:
    pid = tl.program_id(axis=0)  # We use a 1D launch grid so axis is 0.
    # This program will process inputs that are offset from the initial data.
    # For instance, if you had a vector of length 256 and block_size of 64, the programs
    # would each access the elements [0:64, 64:128, 128:192, 192:256].
    # Note that offsets is a list of pointers:
    block_start = pid * BLOCK_SIZE
    offsets = block_start + tl.arange(0, BLOCK_SIZE)
    # Create a mask to guard memory operations against out-of-bounds accesses.
    mask = offsets < n_elements
    # Load x and y from DRAM, masking out any extra elements in case the input is not a
    # multiple of the block size.
    x = tl.load(x_ptr + offsets, mask=mask)
    y = tl.load(y_ptr + offsets, mask=mask)
    output = x + y
    # Write x + y back to DRAM.
    tl.store(output_ptr + offsets, output, mask=mask)
我们再声明一个辅助函数,用于 (1) 分配 z 张量以及 (2) 使用合适的网格/块大小将上述内核入队。
def add(x: torch.Tensor, y: torch.Tensor):
    # We need to preallocate the output.
    output = torch.empty_like(x)
    assert x.device == DEVICE and y.device == DEVICE and output.device == DEVICE
    n_elements = output.numel()
    # The SPMD launch grid denotes the number of kernel instances that run in parallel.
    # It is analogous to CUDA launch grids. It can be either Tuple[int], or Callable(metaparameters) -> Tuple[int].
    # In this case, we use a 1D grid where the size is the number of blocks:
    grid = lambda meta: (triton.cdiv(n_elements, meta['BLOCK_SIZE']), )
    # NOTE:
    #  - Each torch.tensor object is implicitly converted into a pointer to its first element.
    #  - `triton.jit`'ed functions can be indexed with a launch grid to obtain a callable GPU kernel.
    #  - Don't forget to pass meta-parameters as keywords arguments.
    add_kernel[grid](x, y, output, n_elements, BLOCK_SIZE=1024)
    # We return a handle to z but, since `torch.cuda.synchronize()` hasn't been called, the kernel is still
    # running asynchronously at this point.
    return output
现在,我们可以使用上述函数来计算两个 torch.tensor 对象的逐元素和,并测试其正确性。
torch.manual_seed(0)
size = 98432
x = torch.rand(size, device=DEVICE)
y = torch.rand(size, device=DEVICE)
output_torch = x + y
output_triton = add(x, y)
print(output_torch)
print(output_triton)
print(f'The maximum difference between torch and triton is '
      f'{torch.max(torch.abs(output_torch - output_triton))}')
tensor([1.3713, 1.3076, 0.4940,  ..., 0.6724, 1.2141, 0.9733], device='cuda:0')
tensor([1.3713, 1.3076, 0.4940,  ..., 0.6724, 1.2141, 0.9733], device='cuda:0')
The maximum difference between torch and triton is 0.0
看起来一切顺利!
基准测试
现在,我们可以在尺寸不断增加的向量上对我们的自定义算子进行基准测试,以了解其相对于 PyTorch 的性能表现。为简化操作,Triton 提供了一套内置的工具函数,使我们能够简明地绘制出自定义算子在不同问题规模下的性能图表。
@triton.testing.perf_report(
    triton.testing.Benchmark(
        x_names=['size'],  # Argument names to use as an x-axis for the plot.
        x_vals=[2**i for i in range(12, 28, 1)],  # Different possible values for `x_name`.
        x_log=True,  # x axis is logarithmic.
        line_arg='provider',  # Argument name whose value corresponds to a different line in the plot.
        line_vals=['triton', 'torch'],  # Possible values for `line_arg`.
        line_names=['Triton', 'Torch'],  # Label name for the lines.
        styles=[('blue', '-'), ('green', '-')],  # Line styles.
        ylabel='GB/s',  # Label name for the y-axis.
        plot_name='vector-add-performance',  # Name for the plot. Used also as a file name for saving the plot.
        args={},  # Values for function arguments not in `x_names` and `y_name`.
    ))
def benchmark(size, provider):
    x = torch.rand(size, device=DEVICE, dtype=torch.float32)
    y = torch.rand(size, device=DEVICE, dtype=torch.float32)
    quantiles = [0.5, 0.2, 0.8]
    if provider == 'torch':
        ms, min_ms, max_ms = triton.testing.do_bench(lambda: x + y, quantiles=quantiles)
    if provider == 'triton':
        ms, min_ms, max_ms = triton.testing.do_bench(lambda: add(x, y), quantiles=quantiles)
    gbps = lambda ms: 3 * x.numel() * x.element_size() * 1e-9 / (ms * 1e-3)
    return gbps(ms), gbps(max_ms), gbps(min_ms)
现在我们可以运行上面这个被装饰的函数。传递 print_data=True 来查看性能数据,传递 show_plots=True 来绘制图表,和/或传递 `save_path=’/path/to/results/’ 来将它们与原始 CSV 数据一同保存到磁盘。
benchmark.run(print_data=True, show_plots=True)
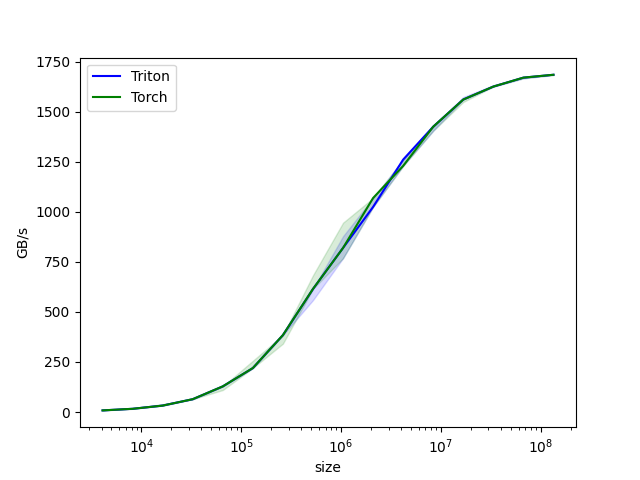
vector-add-performance:
           size       Triton        Torch
0        4096.0     8.000000     8.000000
1        8192.0    15.999999    15.999999
2       16384.0    31.999999    31.999999
3       32768.0    63.999998    63.999998
4       65536.0   127.999995   127.999995
5      131072.0   219.428568   219.428568
6      262144.0   384.000001   384.000001
7      524288.0   614.400016   614.400016
8     1048576.0   819.200021   819.200021
9     2097152.0  1023.999964  1068.521715
10    4194304.0  1260.307736  1260.307736
11    8388608.0  1424.695621  1424.695621
12   16777216.0  1560.380965  1560.380965
13   33554432.0  1624.859540  1624.859540
14   67108864.0  1669.706983  1669.706983
15  134217728.0  1684.008546  1684.008546
脚本总运行时间: (0 分 9.602 秒)